Last year at the Bus Bash in Ohio, the older coaches were
the most interesting. One old Flex, a Custom Coach conversion had a great REAL door lock,
no RV junk, no hardware store cheap O, but a steel pin about an inch in diameter and a
lock set that grabbed real hard around the pin for a secure lock.
Questioning the builder, he claimed that Ford and Peterbuilt used
the locks and Ford was cheaper. Perhaps it is but the Ford heavy truck dealer in New Haven
CT couldn’t "do" anything without da part number, and was too lazy or
stupid to go look in Da ‘Book.
The Peterbuilt parts man whipped two out of a bin to compare
[L&R] and then printed the drawing for me. Here is the break down of the Peterbuilt
parts:
| Name |
Part Number |
Price |
| Basis for the setup and latch |
20-08229L |
$17.10 |
| Door plate-holds the striker plate |
20-10611 |
$9.34 |
| Striker pin-is what gets grabbed |
20-12972 |
$13.73 |
| Striker plate-holds the pin |
20-07542 |
$3.37 |
| Door shim-lets you adjust how far the pin stick out |
20.08233 |
$.97 |
| Name |
Part Number |
Price |
| Outside door handle/lock |
FTL A18-35381-000 |
$47.48 |
| Inside door release |
PAC K294-195 |
$37.40 |
| Cylinder kit |
BRS 702511 |
$22.00 |
TOTAL FOR ALL PARTS |
$151.39 |
This worked for the door edge, door frame and holes cut inside
and outside for the door handles. An access hole was cut to allow the striker backing
plate to be slipped in. The inside door covering had to be removed to access the inside of
the door to install the latch, after the hole was cut. The hardest part was finding 5/32
rod to bend so the parts could work together. I would have much preferred drill rod, but
finding none locally, I use the material in the hardware rack at the local hardware store
which was stiff.
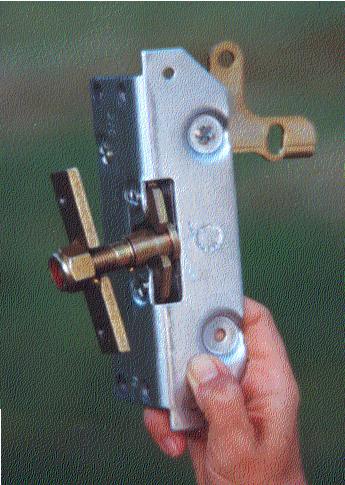
Below is a photo of the "guts" of the lock installed
with all the 5/32 rods connected. The measurements given are for a
GM and will no douby be different for most other coaches.
The center of the Pin is 31 ¾" from the bottom step,
which also is 3" from the flat spot where the hand rail mounts. The leading edge of
the outside handle that has the key lock, is 6" back from the trailing [non hinge]
door edge, measured on the outside and 42 ½" up from the door
bottom.
The key hole is foward in the opening handle. You can insert
the lock cylinder either so the key rotates up to lock or down to lock. Inside, the
opening handle faces so your hand comes down from the top and pulls in and down on the
unlocking portion. The lower edge of the unlocking mechanism is 33 ¾" up from the
door bottom edge and 7" from the opening edge of the door. As all measurements are to
the edge of the pieces, all the hole measurements will be in a slightly different
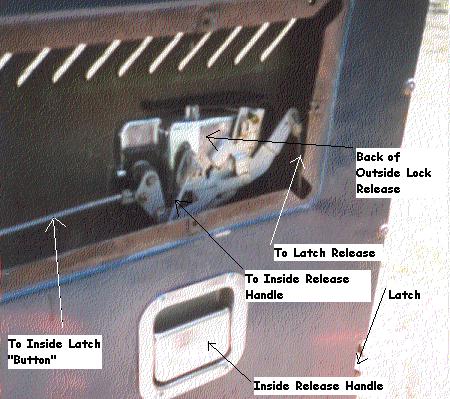
location. The inside security door lock (equavilent to the "button") in a car
door is another rod, this time bent 90 deg and with a elastic stop nut that sticks out a
slot in the door.
Slot is located 42" up from the
bottom of the door and 23" from the opening edge. All the inside rods will become
easy to understand if you will close the bolt grabber and trigger it open, a few times to
see what it "needs".
There is no question this baby locks! It sounds like a
bankster’s vault closing. Hope this is enough info to begin making your conversion as
safe as you want. I left intact the inside drivers handle to close the door so to open the
door I release the drivers handle then pull on the inside handle to unlatch and open.
Removing the drivers handle is possible if you wish. Slamming the door from outside does
not lock the drivers handle, making the old outside door push button an ideal place to
trigger a burglar alarm.
SURPRISE !!
Hope this will get you folks started on having a safe secure coach.
FAST FRED

Chris Christensen, from Dixon California is installing this door latch from Fred's
article. Below is some additional information. I would like to again thank Fred and Chris.
If I can get Chris to bring by the parts, I will add some photos with my digital camera.
The parts list was pretty right on except minor price changes (which will probably be
different from vendor to vendor - I actually got it for less than Fred said) and there was
one part which was listed as a Freightliner part and it is actually a Kenworth part.
All of the items listed in among the Peterbuilt parts were correct part numbers and I
was able to obtain everything from the local Peterbuilt dealer (F.B Hart on Richard Blvd.,
Sacto). All items were in stock and no waiting necessary.
The Freightliner parts I got from Delta Truck Center in W. Sac on Evergreen Ave. They
had both parts (the outside door handle & cylinder kit) in stock.
The only correction which needs to be made is the inside door release, P/N: PAC
K294-195, is not a Freightliner part but is actually a Kenworth part. I got it at the
Kenworth dealer in W. Sac, right across the street from the Freightliner parts store.
I would make one suggestion, addition, or modification to Fred’s "menu".
While at the Freightliner parts store getting the cylinder kit (BRS 702511), the counter
man suggested that if instead I got cylinder kit BRS 702013 ($26.19), which is the outside
door lock and also a cylinder lock for an ignition switch. So I got that BRS 702013 kit
and also bought a new ignition switch, P/N: POL-31-152 ($13.86). I then put the one new
cylinders in the new door latch, and the other new cylinder in the new ignition switch.
Now, not only do I have an ignition switch which the bus never had, I also have an
ignition switch that uses a key which matches the front door lock.
So the parts were readily available, reasonably price, and within an hour of starting
the search I had all the necessary parts. And Fred is right, these are very heavy duty,
but still "presentable" for a bus conversion.
The only problem now is trying to figure out how the linkage assemblies of all these
items fit together. It is sort of like trying to solve a Chinese puzzle. The more you look
at all the linkage receivers the more confusing it gets. Like Fred said he had to make his
own linkage, which I have no problem with, if I could just figure out where the linkage
assemblies are needed so I know how to make them.
I emailed Fast Fred and asked him if he could send me a diagram for the linkage. He
said he would try to make a supplement to his post.